How a Garage Door Opener Actually Works (and Why That Matters for the Repair)
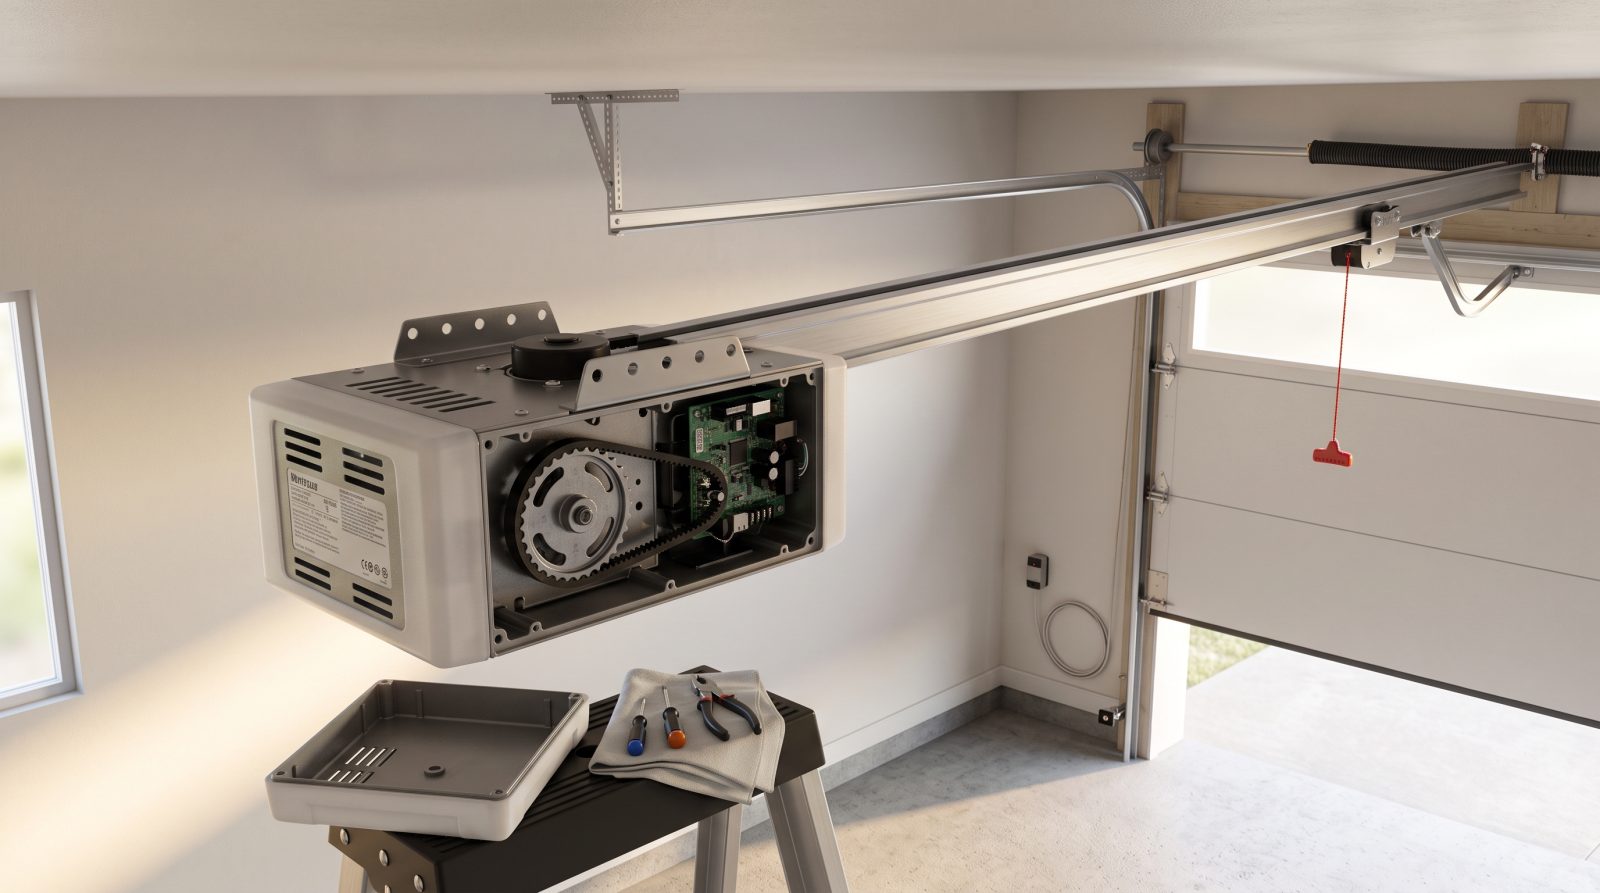
Most homeowners think of the opener as a single machine, but it is really four cooperating subsystems, and a good diagnosis starts by figuring out which one failed. The motor and gearbox provide the force. The drive system, which is a chain, a belt, or a screw drive, carries that force along the rail to the trolley that pulls the door. The logic board is the small computer that interprets your remote, your wall button, and the safety sensors, then tells the motor what to do. Finally, the safety and travel system, including the photo-eye sensors near the floor and the open and close limit settings, decides how far the door travels and stops it from closing on an obstruction.
This matters because the springs, not the opener, do the real lifting. A properly balanced door is counterbalanced by torsion or extension springs so the opener only has to overcome friction and inertia. When a spring breaks, the opener suddenly has to lift the door's full weight, often well over a hundred pounds, which it was never designed to do. The result looks exactly like an opener failure: the motor strains, hums, runs for a second and reverses, or trips its overload. We see this constantly, and replacing a motor that died trying to lift a door with a broken spring just kills the new motor too. That is why the first thing a competent tech does is pull the red emergency release and lift the door by hand to test the balance.
Understanding the subsystems also explains why opener problems are sometimes free to fix and sometimes call for a new unit. A misaligned sensor or a dead remote battery is a five-minute correction. A stripped plastic main gear is a common, inexpensive part on chain-drive units that are otherwise sound. But a fried logic board on an opener that is already fifteen-plus years old is a moment to weigh repair against replacement, because parts availability and the cost of stacking repairs start to work against you.
- Motor and gearbox: provides lifting force; a worn gear or burned-out motor is a frequent failure point on older chain drives.
- Drive system: chain, belt, or screw drive that moves the trolley; belts are quieter, chains are durable, screw drives are sensitive to lubrication.
- Logic board: the brain that reads remotes, the wall button, and sensors; vulnerable to power surges and age.
- Safety and travel system: photo-eye sensors and open/close limits that control travel distance and prevent crushing.
The Most Common Opener Failures We Diagnose in Bay Area Homes
After working on doors throughout the region, certain failures come up again and again, and the local environment plays a real role. Coastal and bayside homes in places like Pacifica, the Sunset, Alameda, and along the Peninsula deal with salt air and persistent damp that corrode contacts, rust chains, and degrade sensor wiring faster than inland areas. Hotter inland valleys like the South Bay and the Tri-Valley put more thermal stress on logic boards and capacitors. And the Bay Area's older housing stock means we encounter a lot of aging openers that have simply reached the end of their service life.
The single most common 'opener' problem we find is not the opener at all but a balance or sensor issue. When a door reverses right before it closes, the culprit is almost always a misaligned or dirty photo-eye sensor, or limit settings that have drifted. When the motor hums but the door doesn't move, it is frequently a broken spring or a stripped drive gear. When nothing happens at all, we work back through the power supply, the wall button, the logic board, and the remotes in order. Diagnosing in that sequence avoids the expensive mistake of replacing a working part.
- Door reverses before closing: usually misaligned or dirty photo-eye sensors, an obstruction in the track, or close-limit settings that need adjustment.
- Motor runs but door won't move: commonly a broken spring forcing the opener to lift full weight, a stripped main gear, or a disengaged trolley.
- Remote works but wall button doesn't (or vice versa): points to a wiring fault, a failed button, or a logic-board issue rather than a dead opener.
- Opener completely dead: trace power first (outlet, breaker, GFCI), then the logic board; surge damage is common in older units.
- Intermittent or weak range on remotes: dying remote batteries, a failing receiver, or radio interference, not necessarily a motor problem.
- Loud grinding or rattling: a worn gear, a dry or loose chain, or hardware that needs service before it causes a bigger failure.
Safe Troubleshooting You Can Do Before You Call
Some opener problems have genuinely simple fixes, and we would rather you save a service call when you can. The checks below are safe for any homeowner because they don't involve the springs, the cables, or the high-tension parts of the system, which are the things that cause serious injuries and should always be left to a technician.
Work through these in order. If the door still won't behave after the sensor, power, and remote checks, stop there. The next steps involve diagnosing the logic board, the drive gear, or the spring balance, and those are where a wrong move gets expensive or dangerous. A quick note on the manual release: only pull the red emergency cord when the door is fully closed. Pulling it on a partially open door, especially one with a weak or broken spring, can let the door drop.
- Check the photo-eye sensors: they sit near the floor on both sides. Make sure both indicator lights are steady, wipe the lenses, and confirm nothing is blocking the beam. A blinking sensor light almost always explains a door that won't close.
- Confirm power: verify the opener is plugged in, check the breaker, and reset the GFCI outlet if there is one. Try a lamp in the same outlet to rule out a dead receptacle.
- Swap the remote battery: a weak battery causes short range and intermittent response before it dies completely.
- Test the wall button separately from the remote: if the wall button works but remotes don't, the issue is the remotes or receiver, not the motor.
- Look and listen: a chain that is sagging or dry, or a visibly broken spring above the door, tells you the problem is mechanical, not electronic.
- Test the balance only with the door closed: pull the red release, lift by hand, and notice if the door is heavy or slams. A door that won't stay halfway up has a spring problem and needs a pro, not a new opener.
What a Professional Opener Repair Looks Like With Us
Because we run a mobile service, the visit starts in your driveway with the door, not with a parts catalog. The first step is always a balance and safety check: we disconnect the opener, lift the door by hand, and confirm the springs are doing their job. If the door is heavy or won't hold position, we address the spring system first, because no opener repair is meaningful on a door the motor can't lift safely.
From there we move through the system methodically. We test the photo-eye sensors and the up and down travel limits, since a surprising share of opener complaints resolve right here with no parts at all. We check the drive mechanism for a stripped gear, chain slack, or trolley wear. We test the logic board's response to the wall button, the remotes, and the sensor inputs to isolate electronic faults, and we inspect for surge or moisture damage that's common in coastal and older Bay Area homes. Only after the actual cause is identified do we talk parts and cost, so you're not paying for a guess.
We will also be clear with you about repair versus replacement. If you have a sound opener with a stripped gear or a dead capacitor, a targeted repair is usually the smart, economical call. If the unit is well past its service life, the logic board is fried, and parts are scarce, we'll lay out the math on a replacement rather than stacking repairs onto a machine that's near the end. Either way, every door gets the safety sensors and travel limits checked before we leave, because an opener that closes is only doing half its job if it won't reverse on an obstruction.
- Balance and spring check first, by hand, before any opener work.
- Sensor alignment and travel-limit calibration, which resolves many complaints with no parts.
- Drive inspection: gear, chain or belt tension, and trolley condition.
- Logic-board and remote diagnostics to isolate true electronic faults.
- A clear repair-versus-replace recommendation with the reasoning shown, not just a price.
What Opener Repairs Typically Cost (and What Drives the Number)
Homeowners always want a number, and the honest answer is that opener repair costs sit in a range because the work varies widely. As a general industry guide, a simple sensor realignment or limit adjustment is at the low end and often the least expensive thing we do. A common part replacement, such as a drive gear, a capacitor, or a remote and receiver, falls in a moderate range. A full opener replacement is the largest number, and where it lands depends heavily on the type of opener you choose. These are typical industry ranges meant to set expectations, not a quote; your actual price depends on the door, the parts, the opener model, and the scope once we see it.
Several real factors move the price. Belt-drive openers cost more than chain drives but run far quieter, which matters a lot in homes with a bedroom over the garage, a common layout in Bay Area townhomes and newer construction. Wi-Fi and smart features, battery backup (which California requires on new residential openers so the door still works during a power outage), and higher horsepower for heavy wood or insulated doors all add to a replacement. On the repair side, the big cost driver is whether the underlying problem is really the opener or a spring and balance issue masquerading as one, which is exactly why the in-person diagnosis comes first.
We give the estimate after we've seen the door, because a number quoted sight-unseen is either padded to be safe or a low figure that climbs once the tech arrives. When you call, we'll walk through your symptoms, and the on-site assessment turns that into a real, itemized price you can decide on before any work begins.
- Low end: sensor realignment, travel-limit calibration, minor adjustments.
- Moderate: drive gear, capacitor, or remote and receiver replacement on a sound unit.
- Higher: full opener replacement, with price driven by drive type, smart features, battery backup, and horsepower.
- Hidden cost driver: a spring or balance problem misread as an opener failure, which a proper diagnosis catches first.